アプリ プロファイルでカスタム アプリの使用を選択した場合、移行用の Microsoft 365 ユーザー に任意のユーザーを指定することができますが、アプリにこれらの権限が付与されていることを確認してください。
|
API 名 |
権限名 |
説明 |
タイプ |
必要となる理由 |
|
Microsoft Graph |
Domain.Read.All |
Read domains |
アプリケーション |
SharePoint 管理センターに接続する移行先テナントの初期ドメインを定義します。 |
|
Sites.ReadWrite.All |
Read and write items in all site collections |
アプリケーション |
SharePoint データを移行先に移行します。 | |
|
User.Read.All |
Read all users' full profiles |
アプリケーション |
OneDrive ユーザー名で移行先 OneDrive サイトの URL を取得します。 | |
|
SharePoint |
Sites.FullControl.All |
Have full control of all site collections |
アプリケーション |
SharePoint データを移行先に移行します。 |
|
User.Read.All |
Read user profiles |
アプリケーション |
OneDrive ユーザー名で移行先 OneDrive サイトの URL を取得します。 | |
|
Azure Rights Management Services |
Content.DelegatedWriter |
Create protected content on behalf of a user |
アプリケーション |
ファイル / ライブラリ / サイトの秘密度ラベルを管理する場合にのみ必要です。 |
|
Content.Writer |
Create protected content |
アプリケーション | ||
|
Microsoft Information Protection Sync Service |
UnifiedPolicy.Tenant.Read |
Read all unified policies of the tenant |
アプリケーション |
ファイル / ライブラリ / サイトの秘密度ラベルを管理する場合にのみ必要です。 |
*注意: 以下のコマンドを使用し、マニフェスト を介して必要な API 権限を追加することができます。
"requiredResourceAccess": [
{
"resourceAppId": "870c4f2e-85b6-4d43-bdda-6ed9a579b725",
"resourceAccess": [
{
"id": "8b2071cd-015a-4025-8052-1c0dba2d3f64",
"type": "Role"
}
]
},
{
"resourceAppId": "00000003-0000-0ff1-ce00-000000000000",
"resourceAccess": [
{
"id": "df021288-bdef-4463-88db-98f22de89214",
"type": "Role"
},
{
"id": "678536fe-1083-478a-9c59-b99265e6b0d3",
"type": "Role"
}
]
},
{
"resourceAppId": "00000012-0000-0000-c000-000000000000",
"resourceAccess": [
{
"id": "006e763d-a822-41fc-8df5-8d3d7fe20022",
"type": "Role"
},
{
"id": "d13f921c-7f21-4c08-bade-db9d048bd0da",
"type": "Role"
}
]
},
{
"resourceAppId": "00000003-0000-0000-c000-000000000000",
"resourceAccess": [
{
"id": "9492366f-7969-46a4-8d15-ed1a20078fff",
"type": "Role"
},
{
"id": "df021288-bdef-4463-88db-98f22de89214",
"type": "Role"
},
{
"id": "dbb9058a-0e50-45d7-ae91-66909b5d4664",
"type": "Role"
}
]
}
],
*注意: 上位に一覧表示している権限は、テナント内のすべての OneDrive サイトを移行するために必要です。特定の OneDrive サイトのみを移行する場合、異なる権限設定が構成されている別のカスタム アプリの使用に変更してください。詳細については、以下の説明を参照してください。
1. アプリに使用する以下の権限を追加します。
|
API 名 |
権限名 |
説明 |
タイプ |
必要となる理由 |
|
Microsoft Graph |
Domain.Read.All |
Read domains |
アプリケーション |
SharePoint 管理センターに接続する移行先テナントの初期ドメインを定義します。 |
|
Sites.Selected |
Access selected site collections |
アプリケーション |
指定した OneDrive サイトのデータを取得して移行します。 | |
|
User.Read.All |
Read all users' full profiles |
アプリケーション |
OneDrive ユーザー名で移行先 OneDrive サイトの URL を取得します。 | |
|
SharePoint |
Sites.Selected |
Access selected site collections |
アプリケーション |
指定した OneDrive サイトのデータを取得して移行します。 |
|
User.Read.All |
Read user profiles |
アプリケーション |
OneDrive ユーザー名で移行先 OneDrive サイトの URL を取得します。 | |
|
Azure Rights Management Services |
Content.DelegatedWriter |
Create protected content on behalf of a user |
アプリケーション |
ファイル / ライブラリ / サイトの秘密度ラベルを管理する場合にのみ必要です。 |
|
Content.Writer |
Create protected content |
アプリケーション | ||
|
Microsoft Information Protection Sync Service |
UnifiedPolicy.Tenant.Read |
Read all unified policies of the tenant |
アプリケーション |
ファイル / ライブラリ / サイトの秘密度ラベルを管理する場合にのみ必要です。 |
以下のコマンドを使用して、マニフェスト を介して必要な API 権限を追加することができます。
"requiredResourceAccess": [
{
"resourceAppId": "870c4f2e-85b6-4d43-bdda-6ed9a579b725",
"resourceAccess": [
{
"id": "8b2071cd-015a-4025-8052-1c0dba2d3f64",
"type": "Role"
}
]
},
{
"resourceAppId": "00000012-0000-0000-c000-000000000000",
"resourceAccess": [
{
"id": "006e763d-a822-41fc-8df5-8d3d7fe20022",
"type": "Role"
},
{
"id": "d13f921c-7f21-4c08-bade-db9d048bd0da",
"type": "Role"
}
]
},
{
"resourceAppId": "00000003-0000-0ff1-ce00-000000000000",
"resourceAccess": [
{
"id": "df021288-bdef-4463-88db-98f22de89214",
"type": "Role"
},
{
"id": "20d37865-089c-4dee-8c41-6967602d4ac8",
"type": "Role"
}
]
},
{
"resourceAppId": "00000003-0000-0000-c000-000000000000",
"resourceAccess": [
{
"id": "dbb9058a-0e50-45d7-ae91-66909b5d4664",
"type": "Role"
},
{
"id": "883ea226-0bf2-4a8f-9f9d-92c9162a727d",
"type": "Role"
},
{
"id": "df021288-bdef-4463-88db-98f22de89214",
"type": "Role"
}
]
}
],
2. 環境で PnP PowerShell のインストール を実行します。
3. ストレージ場所 (英語) にアクセスして、RegisterAzureADAppForGrantFullControl.ps1、GrantFullControlForOneDriveUser.ps1、OneDriveUsers.csv ファイルをネットワーク接続が構成されているマシンのカスタム フォルダーにダウンロードします。
4. カスタム フォルダーで、メモ帳で RegisterAzureADAppForGrantFullControl.ps1 を開いて、必要に応じてパラメーターの値を構成するには、以下の説明を参照してください。その後、ファイルを保存します。
•Tenant – テナントの名前です。例: mytenant.onmicrosoft.com
•AzureEnvironment – 認証用の Azure 環境です。
対応する値: Production、PPE、China、Germany、Custom
•ApplicationName – 作成する Azure AD アプリの名前です (必須ではありません)。既定では、名前は PnP PowerShell For Grant Full Control になります。
5. Windows PowerShell を開き、Windows PowerShell ウィンドウで以下のコマンドを入力します。
."file path"
解凍されたフォルダー内の RegisterAzureADAppForGrantFullControl.ps1 ファイルの完全パスで file path を置き換え、キーボードの Enter キーを押します。

6. 構成に基づいて以下のパラメーターの値を入力して、キーボードの Enter キーを押します。
•Tenant – テナントの名前です。例: mytenant.onmicrosoft.com
•AzureEnvironment – 認証用の Azure 環境です。
その後、Microsoft ログイン ウィンドウが表示されます。実行を続行するには、Microsoft 365 グローバル管理者ロールを持つユーザーを使用してログインする必要があります。
*注意: Azure AD アプリを登録すると、要求されているアクセス許可 ページが表示されます。[同意] をクリックしてアプリを登録します。
以下のテーブルには、アプリの必要な権限が一覧表示されます。
|
API |
アクセス許可 |
タイプ |
|
Microsoft Graph |
Sites.FullControl.All (Have full control of all site collections) |
委任済み |
|
User.Read.All (Read all users’ full profiles) |
委任済み | |
|
SharePoint/Office 365 SharePoint Online |
AllSites.FullControl (Have full control of all site collections) |
委任済み |
|
User.Read.All (Read user profiles) |
委任済み |
実行後、Azure AD アプリのクライアント ID が Windows PowerShell ウィンドウに表示されます。クライアント ID は GrantFullControlForSiteCollection.ps1 スクリプトを実行する際に使用されることに注意してください。

スクリプトと同じディレクトリに Register Azure AD App_(TimeStamp).log ファイルが生成されます。このファイルで実行する詳細を表示することができます。
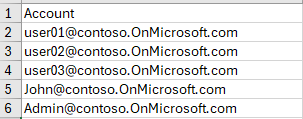
7. カスタム フォルダーで、OneDriveUsers.csv ファイルを開き、対象 OneDrive サイトのユーザー名を以下のように入力します。

8. アプリに OneDrive サイトのフル コントロール権限を付与するには、グローバル管理者ロールを持つ同意ユーザーを用意し、そのユーザーをサイトの サイト コレクションの管理者 に追加します。
9. カスタム フォルダーで、GrantFullControlForOneDriveUser.ps1 ファイルをメモ帳で開きます。
10. 必要な情報を使用して、以下のパラメーターを構成します。
•$appId = 'Custom App client ID' – カスタム アプリのクライアント ID を入力します。
•$appName = 'Custom App Display name' – カスタム アプリの表示名を入力します。
•$connection = Connect-PnPOnline -Url 'SharePoint Admin Center URL' – テナントの SharePoint 管理センター URL を入力します。
*注意: カスタム アプリが SharePoint 管理センター URL へのアクセス権を持っていない可能性があります。Fly Server 接続の追加時にテナント ドメインの検証を回避するには、…\FLY\Manager\Control\bin\ TimerService.exe.config ファイルで <add key="CheckInitialDomainError" value="false"/> ノードを追加して、Fly Timer Service を再開してください。この変更は移行ジョブに影響を与えません。
11. Windows PowerShell を開き、Windows PowerShell ウィンドウで以下のコマンドを入力します。
."file path"
解凍されたフォルダー内の GrantFullControlForOneDriveUser.ps1 ファイルの完全パスで file path を置き換え、キーボードの Enter キーを押します。

12. カスタム アプリの証明書キーを入力し、キーボードの Enter を押します。
13. 資格情報の要求 ウィンドウで、ステップ 8 で準備した同意ユーザーとそのパスワードを入力し、[OK] をクリックします。
14. プロセスの完了後、必要に応じて、サイトの サイト コレクションの管理者 から同意ユーザーを削除することができます。